The Making of the CSPmap
The purpose of this page is to document the process that went into making the CSPmap. With this information, you can put together your own custom map for Anarchy Online by starting from scratch or working off of my source files.
Underlying Terrain
Since I started the whole map with Broken Shores, I'll use that for my example. I also used Adobe Photoshop for the creation of the map and image manipulations.

shadow overlay
for zone 665 -
Broken Shores
You need the base terrain by making subsequent screen captures of the "PF Map", but this is made rather difficult by the map changing according to the time of day (in game time). The shading of the maps also change as the day continues so that's another roadblock. How you can get around this, though, is to alter the shadow overlays so that they're completely blank for the night-time (which lasts long enough for you to take the screen caps). You can find the shadow files in cd_image/data/shadows within your AO installation. [thanks Bart!] Each file is named according to it's zone number and end with a SDW extension. This takes a little technical know-how, but the shadow files are relatively simple. They're basically a series of PNG's concatenated into a single file. You can extract the individual files by using the AOB Resource Basher or by cutting and copying with a hex-editor. You'll actually need one of these layers later in the process. Each playfield has different size images, so you'll need to create seperate all-white PNG's for each zone and copy the dimensions from the PNG's you find in the shadow files (Broken Shores is 384 x 1536 px). The darkest one is the "night" shadow and you want to replace it with your all-white version for each Rubi-ka zone. Now, when you're in-game, your PF Map will be quite flat and bright when it's completely night.

Broken Shores' screen
caps patched together
Now that you have the basic terrain visible, you screen capture the "PF Map" for the entire play area. The easiest way to be sure you get it all is to use the scroll bars. Start at a corner, pick a point on the map on the side you're going to scroll towards and then scroll until that point is on the opposite side. This way, you can be sure there is enough terrain left to match up the screen captures to make up the entire map. Be sure to do the whole process without moving your character because the map does slightly change if you move. Screen capping the water areas aren't as important as I painted over them.
After you've done all your screen caps for a zone, it's jigsaw puzzle time! You can determine the size of the image by looking at the shadow file for that zone. For example, the shadow images for Broken Shores (zone 665) are 384px wide by 1536 px tall. You multiply the width by 8 and the height by 4 to get your final size. So, for Broken Shores, 3072px by 6144px. Then, cut the map out of each screen shot, layer them over each other to make one big map, and make sure that it's all aligned with the bottom left corner. Save the finished product as a PNG for safe keeping.

Broken Shores' with
shadow applied
Now, the maps that you get from attaching together screenshots are rather boring and flat. The way to spice them up is to apply one of the shadow overlays and then you'll get something similar to what you see during the day on the PF map. For the CSPmap, I used the brightest layer (I believe the third one) for each zone. If you compare the two images, though, you'll see that the shadow image needs to be blown up and flipped vertically. After flipping the shadow vertically, stretch the width by 8x and the height by 4x. Place the stretched shadow over top of the terrain and set that layer to "multiply" (not "overlay", despite what I called it). You can see the result to the left.
The last step is to paste the image into the map such that the "you are here" indicator shows the right location. I'll leave this to you to figure out ways to accomplish this.
The scale relationship between the PF map and the main layer of the CSPmap is 19% (this was derived by trial and error). From the CSPmap main layer to the small map layer the scale is 25%. From the main layer to the tiny wompah map at the top left of the small map is 6.9%. From the main layer to the small wompah map layer is 10%.
Borders
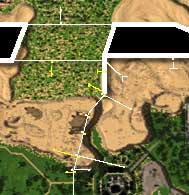
border mapping
Making the zone borders more accurate was a simple (but time consuming) job of empirical testing. Basically, I flew around in a Yalm and tested where solid borders were and where transitional borders were. By taking screen shots of the location pointer on the map I was able to make the borders more accurate.
For the transitional borders that weren't at 90 degree angles I had to take additional screen shots to estimate the angle the border was on. I was able to do this by knowing that when you zone you are pointed orthogonally to the zone border. So, if you take a screen shot right after you zone, then a screen shot after you've flown away from the border without turning, you can draw a line that's at a 90 degree angle to the actual zone border.
There were many spots where the borders overlap, are at different angles depending on which side you're on, or the borders are seperated quite a bit to leave land that's completely inaccessible. In these cases, I tried to take an average of the difference or in the extreme cases I drew the border for the zone that was more "important" (ie the zone which had some game relevant content in that area).
Water, Lava, Toxic Green

CAV with partly
filled-in water
As you may be aware, all "liquids" in the game are invisible on the PF map. For the most part, it's easy to see where the shores are because of the colour change in the terrain at that point. For the harder parts, I had to fly along the shorelines and take screenshots to map the waters. Much of the water hasn't changed from the "Huge Map" terrain that was released by FunCom so I used that as a starting point. The biggest change was in Central Artery Valley and the hardest area to fill-in was Deep Artery Valley as the sea bottom is about the same dark green as the land.
Recording Points
The only good way to mark points on the map accurately was to fly to that spot and take a screenshot. For all the NPC's, I would fly right to where they were standing and took a screen capture of the location pointer on the map to indicate the location on the map. The process was very much like mapping the borders, but some of the NPC's you had to be careful not to get too close to. ;) For the characters that would attack me, I would fly above them and try to line up my "dot" with the NPC's "dot" on the PF map. I also used this method to map pretty much all the points on the map including the player-city controllers.
It seems that I erased all my screen shots when I uninstalled the game from my machine so I don't have any examples for this section.
Creating Notum Field Overlay
Okay, this part took a long long time to hammer out exactly how to do, but I managed to get it down to a process. I'll skip all the frustration I went through and go right to how I did it.
Capturing the LCA's is similar to capturing the underlying terrain in that it involves screen captures of the PF map. In this situation, though, the problem is existing towers in the game obscuring the green land control area. In order to remove all the towers from the PF map, you need to place blank transparent PNG's in to the GUI files. I can't recall exactly how to do this, but I think it involves placing the blank PNG's into a file that's a concatenation of several GUI PNG's in the Anarchy_Online\cd_image\gui . The best thing to do is look for guides on customizing the GUI for information on how to do this.
In order to anchor a particular LCA to the larger map, I would screen cap the PF map with the CSPmap open to that location. I would make sure that my character was close, but not overtop of the LCA so I could anchor the dot in the PF map with the dot on the CSPmap. I would cut-n-copy the screen shot of the CSPmap with the location pointer into Photoshop and then line it up with the source map to get the correct position on the map. Then I would cut-n-copy the PF Map picture over the CSPmap (in photoshop) and line up as accurately as possible the PF location dot with the dot on the CSPmap. Then I would highlight the PF map, do a "Select" -> "Color Range..." (in photoshop), and select all of the green LCA. Next, I would do "Select" -> "Transform Selection", then move the relative point (it's usually at the center of the selection, but you can click and drag it) to over top of the location point (our anchor point). Then, I would scale the selection down to 19% and then add that selection to the layer mask of my LCA layer.
I'm sure that the explanation here would have been a lot better with some screen shots, but unfortunately I don't have any. If you need some clarification, feel free to email me via the contact form.
Note on Text Styles
The layer effects are visible in the source photoshop file, but as I had to render the text layers it's not perfectly clear what settings I used for the text. I'll list here what settings were used and for what. I'm pretty sure most, if not all, of the fonts were typed using no anti-aliasing.
Also, a lot of small text was rendered using the alphabet found here: small_alphabet.psd.
- zone names
- Verdana, 10px, all caps
- large names on cheat layer
- Arial, 12px
- any small text not using the small_alphabet.psd
- Mini 7 Condensed, 10px
- zone names on small map
- Arial, bold, 11px, tracking of 175, all caps, sharp anti-aliasing, black
Note on "Cheat Layer"
Creating the cheat layer background was done via a smart blur with the following settings: radius=11.6, threshold=31.7, quality=high, mode=normal. After the blur, you then desaturate the layer to make it black and white.
Saving the PNG's for the finished CSPmap
I hardcoded the file names into the map compiler so unless you wish to change the compiler, you'll need to save the files with the following names: the very small wompah map on the first layer is named "map1.png", the small map with the mini wompah map at the top left is called "map2.png", the main layer with all LCA's active is called "map3.png", the main layer with only active LCA's for each of the three main zones are called "map3rk1.png", "map3rk2.png", and "map3dnw.png" respectively, and the cheat layer is named "map4.png".
I have placed the finished Photoshop File for the main layer and the wompah layer and small version of the map on the developers' page.
Running the Map Compiler
The compiler is based on Dhurdahl map creator, but interleaves the main map to give different versions for the different game dimensions. There is very little difference between the default map, RK1 and RK2, so interleaving cuts down on a lot of space. However, DNW is very much different (it has only half of the LCA's unlocked), so it was made in to a seperate add-on.
Instructions on how to compile the files are in the comments at the top of the file. You'll need gcc and you may need to install some additional libraries such as gd.
cspmapcreator.ccspmapcreator-dnw.c
Creating the Installer
Installing the add-on maps isn't quite as simple as point-n-click so after enough confused people came asking for help to install the map I created a self-extracting installer. You just point the installer to where your Anarchy Online is installed and then it copies the correct files into the right spots. The installer even does a simple check to make sure you selected a directory that actually contains the game.
Nullsoft Scriptable Install Systemcspmap-MultiLanguage.nsi
cspmap-dnw-addon.nsi
I won't go into the details, but all of the patch files were created using VPatch which works with NSIS.
